http://www.goerpcloud.com/wp-content/uploads/Accounting-for-stocked-items-on-product-receipts-and-vendor-invoices.pdf
Showing posts with label procurement&sourcing. Show all posts
Showing posts with label procurement&sourcing. Show all posts
Sunday, 13 December 2015

Monday, 12 October 2015
Create a Purchase requisition
The objective of this article is to describe how to create and submit a Purchase requisition in Dynamics AX 2012.
You can create a purchase requisitions for products that your organization uses. A purchase requisition is an internal document that authorizes the purchasing department to buy items or services. To be able to create a purchase requisition, a workflow has to be setup.
Create a Purchase Requisition
Access: Procurement and sourcing > Common > Purchase Requisitions > All purchase Requisitions
- Click New
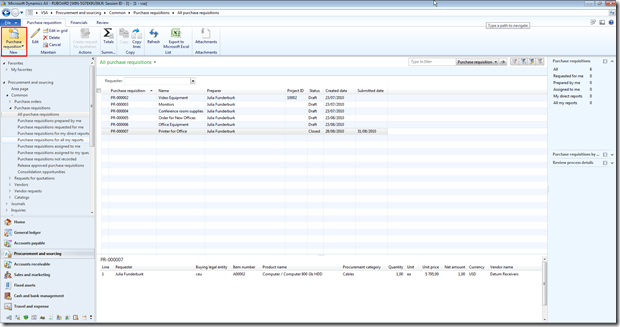
- Enter a description
- Select the Requested date
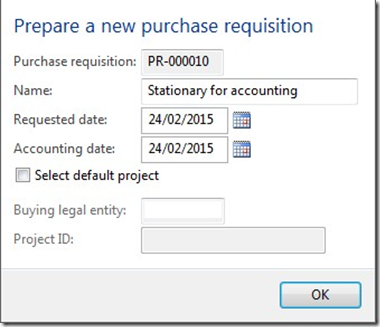
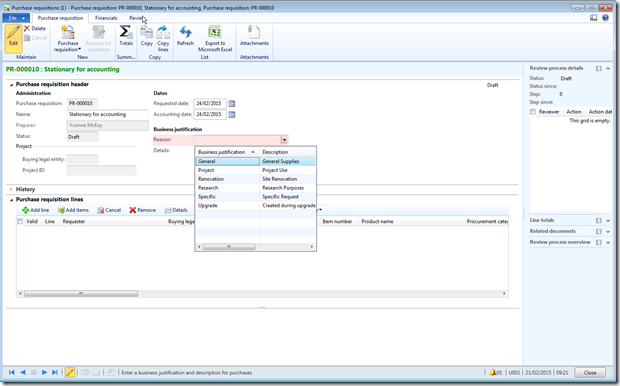
The PR line form is opened
- Select a Reason (the reason can be setup as mandatory in the purchase policy)
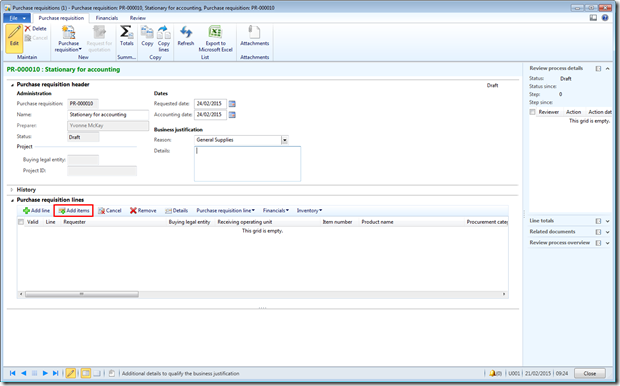
Create the line with option “Add item”
- Click “Add Item”
- Select the Requester of the PR
The default value is the worker linked to the user, but it is possible to setup rules to allow one user to create purchase requisition on behalf of others workers
- If the worker is an employee of several companies, select the buying entity
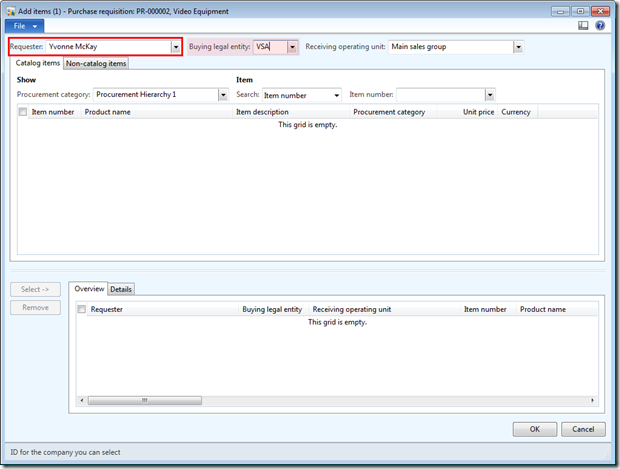
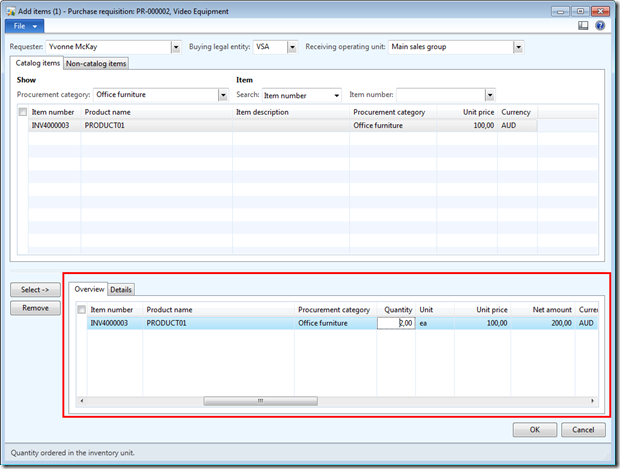
Option A: Select a catalogue item
- Go to the Catalogue Items to select a product (the product need to be include in a Procurement category)
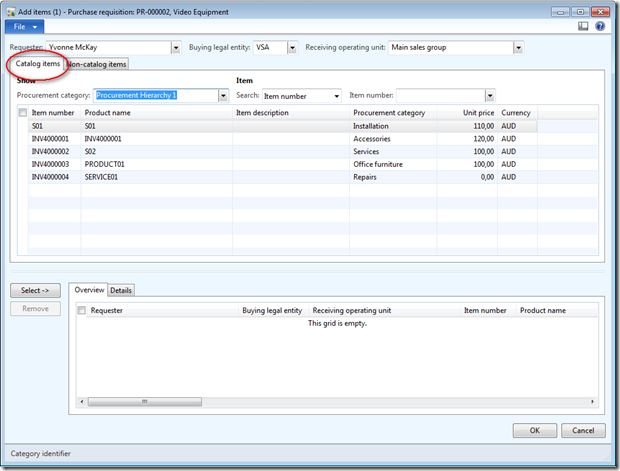
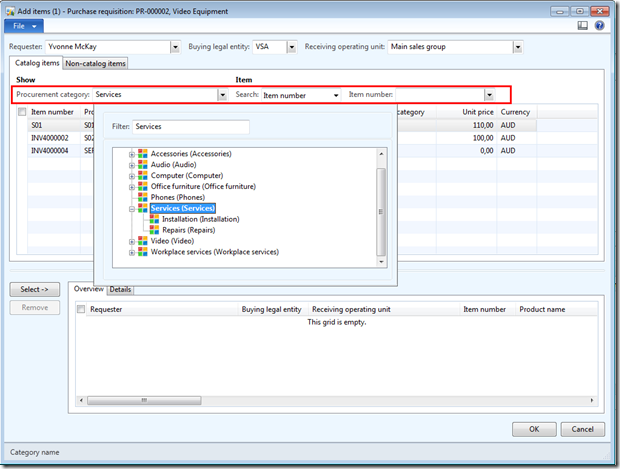
- Use the filter to find the item
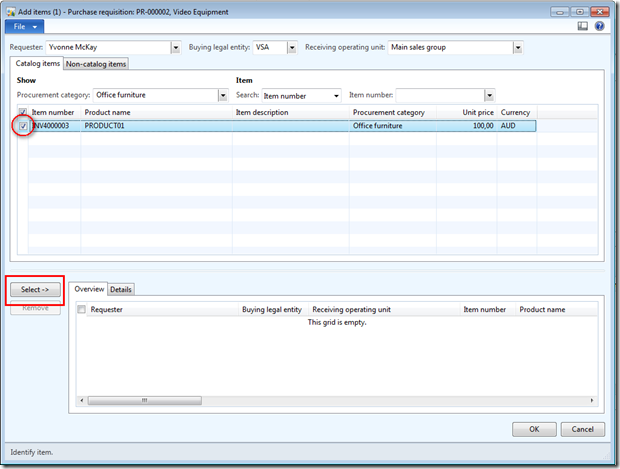
- Select the item and click “Select”
- Enter the quantity
- Vendor and price are coming from the items setup
- Go to the detail tab to select the inventory dimensions
- And click “OK” to add the item to the purchase requisition
Option B: Non catalogue item
- Go to the Non catalogue Items to select request an item that is not available in the catalogue.
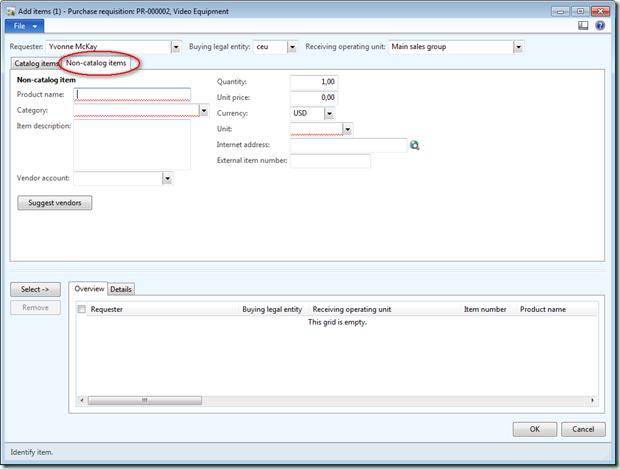
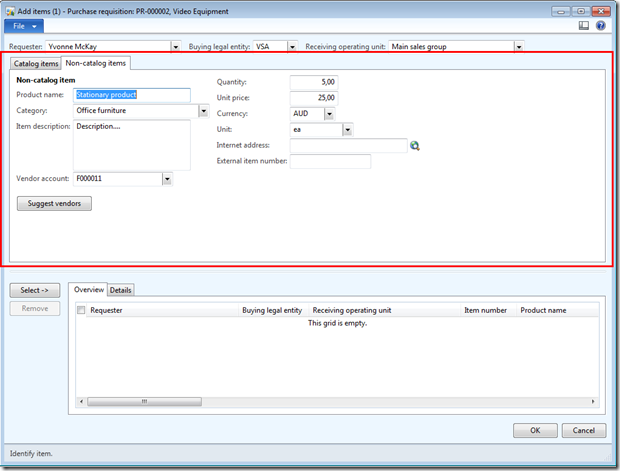
- Enter the Product name
- Select the category of the product
- Enter a description of the product
- Select a vendor or suggest a vendor
- Complete the information with quantity, unit and price
- Click “Select”
- Go to the Details tab to select the inventory dimensions (Site, Warehouse)
- And click “OK”
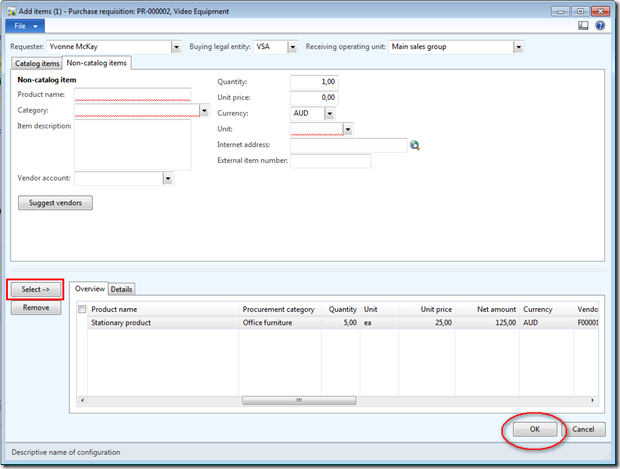
Lines are added to purchase requisitions
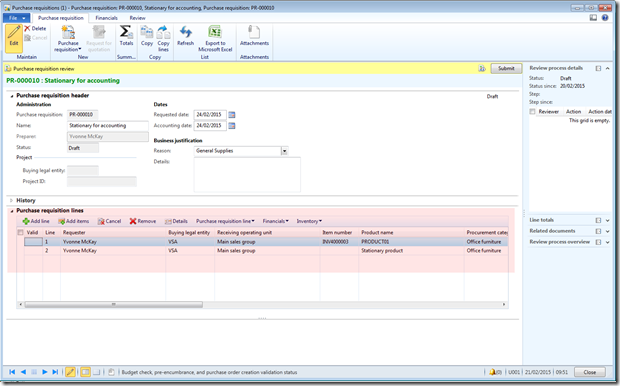
Create the line with option “Add Line”
If you know what the item you need, use this option
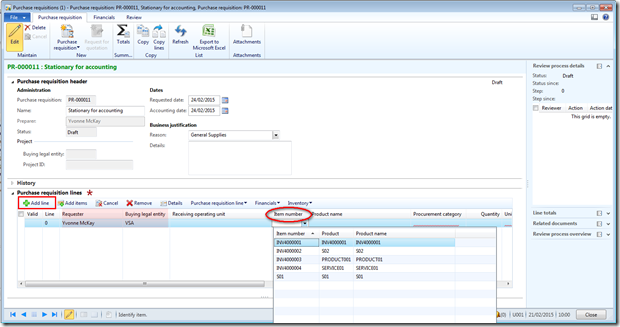
- Click “Add Line”
- Select the requester and the buying entity
- Select the item
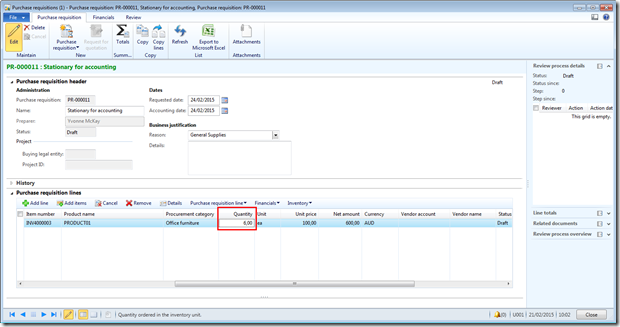
- Enter the quantity
- Unit price and vendor are coming from the item setup
Complete and Submit the PR
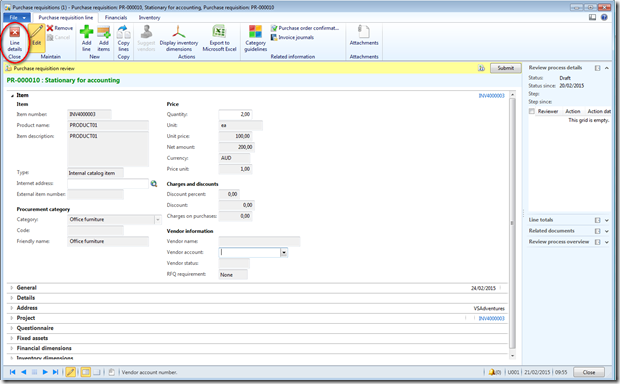
You can click “Details” to Edit the line and complete the information (Financial dimensions for example)
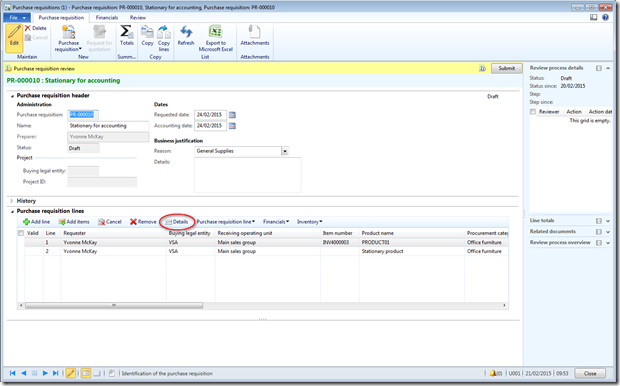
To go back to the Purchase requisition form, click “Close line details”
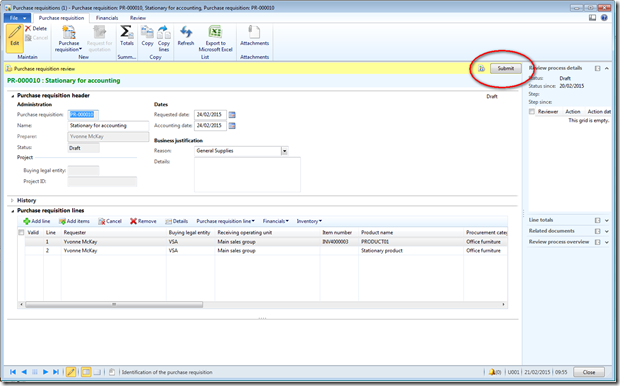
Once the purchase is ready, click “Submit” to submit the PR to the workflow for approval.
ONE INVOICE FOR MULTIPLE PURCHASE ORDERS IN AX 2012
Post single invoice for multiple Purchase orders
There might be a case where the vendor sends a single invoice for multiple purchase orders, in this scenario we will see how to post one invoice for multiple purchase orders of the same vendor.
We are having two PO’s for the same vendor “US- 104 Fabrikam Supplier”
PO Number Qty Unit Price Net Price
000134 10 27.25 272.50
000135 15 78.99 1184.85
Consolidated Net Price for Two PO’s is 1457.35
Step 1: Select the Two Purchase Order
Navigation: Procurement and sourcing> Common> Purchase orders> All purchase orders
- Select the Two PO’s
- Click on the Invoice tab
- Then click on Invoice button

Step 2: Consolidate the Two Purchase orders
- Enter the same invoice number for the two purchase orders
- Then click on the Consolidate invoices button
- Under the Summary update select “Invoice account”
- Then click on the Consolidate to merge the two PO’s into one

Step 3: Total amount of the two Purchase Orders
- The Two Purchase orders are now consolidated
- To check the Invoice amount – click on Summary – Totals or can view on the right side of the form
- Click “Post” to complete the Purchase Order
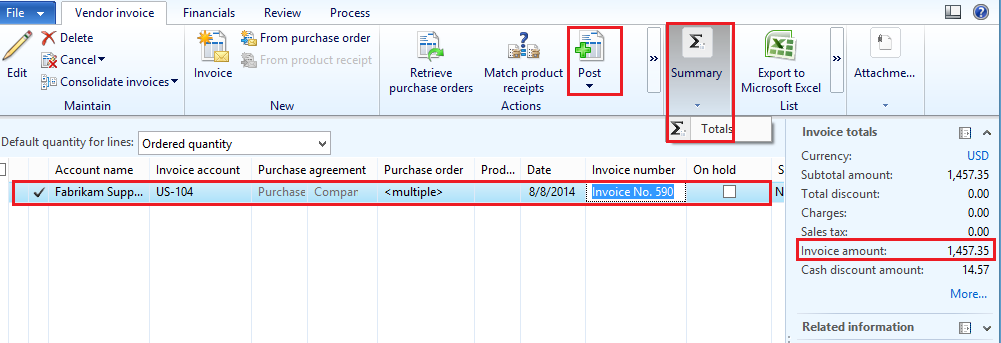
- We can get the Print of the Invoice as shown below:

Step 4: Verify the status of the Purchase Orders, its showing as “Invoiced”
Navigation: Accounts Payable > Common Forms > All Purchase Orders

Step 5: Check the Vendor Invoiced entries
Navigation: Accounts Payable > Common Forms > All Vendors
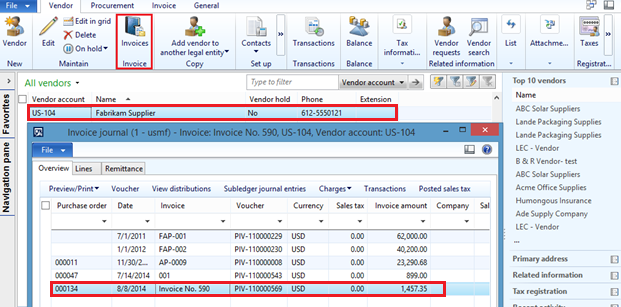
- Select the vendor “US-104”
- Click on Invoice button to view to posted invoices
Purchase requisition workflow
This article describes how to set up in the purchase requisition workflow the approval element done by the project manager.
1/ Create a workflow Participant
Access: Procurement and sourcing > Setup > Policies > Purchase requisitions expenditure reviewers
- Click “New” to create a new expenditure reviewer
- Select the company
- Select “Project Manager”

2/ Setup the workflow
Access: Procurement and sourcing > Setup > Procurement and sourcing workflow
In the workflow, line or header level, add a condition element to check if there is a project populated in the purchase requisition:

- Click “Properties”
- Enter a new title
- Select the condition:

Add a new approval element

Click “Properties” and enter all the information:
- Title
- Notifications
- Actions allowed

Go to the level down, to complete the approval step

- Populate all the text required in the Basics settings
- Click “Assignment”
- Select “Participant”

In the Role base tab:
- Select Type of participant = Expenditure participants
- Select participant = Project manager

- Complete the time limit and the completion policy
Check that the error panel is empty and save the new version of the workflow

The workflow is going to refer to the project setup, to assign the approval to the project manager:

Monday, 21 September 2015
Under delivery of line is xx.xx percent, but the allowed under delivery is only 0.00 percent in Ax 2012

To fix this issue, check the following setups;
- Make sure configuration key is enabled. If configuration key is disabled, no under deliveries are allowed. To check if key is enabled/disabled, navigate to the following path;
- System administrator -> Setup -> Licensing -> License configuration.
- License code – Trade and Logistics,
- Parent key – Trade.

2. Check, ‘Accept underdelivery’ parameter is checked @ Procurement & sourcing -> Setup -> Procurement & sourcing parameters -> Updates -> Accept underdelivery

3. Check if Underdelivery % is defined against the respective item @ Released product details form

If all these setups are properly defined, no issue to accept under delivery.
Happy Learning!
How to cancel Posted Product receipt for Purchase Order in Ax 2012

To cancel the Product receipt, click on the above mentioned highlighted menu ‘Product receipt’. System opens the following form;
Click on Cancel;

Once ‘Cancel’ is clicked, system throws the following info message;

Click ‘Yes’ & system cancel the packing slip.
System also enabled back ‘Product receipt’ button. See the following screen;

To reconfirm if packing slip is cancelled and quantity is not shipped, refer the following navigation;
Accounts payable -> Common -> Purchase orders -> All purchase orders -> Select related purchase order -> Click on General menu -> Click on Line quantity menu button

See the highlighted field where system shows deliver remainder is 10 i.e. Product receipt is successfully cancelled.
P.S. Once order is invoiced, you can not use this functionality.
Error: Account number for transaction type vendor balance does not exist in Ax 2012

When checked thoroughly, it was found that error message was because of ‘Chart of Accounts’ not linked to‘Account structure’.
To link ‘Chart of Accounts’ with ‘Account structure’, refer the following path;
General ledger -> Setup -> Ledge

Once ‘Chart of Accounts’ is linked to‘Account structure’, this issue is sorted out.
Wednesday, 22 April 2015
Process Prepayment in AX 2012
Purchasing agent creates the purchase order and submits a request to AP coordinator to process prepayment:
- Create a new
purchase order under Accounts Payable module for vendor 3107, Alpine Electronics. Let us make a note of their balance before we proceed with a prepaid PO processing for them.

- Create purchase order header and PO line for item(1001) for 600 quantity.

- Click the Purchase tab and click Prepay > Prepayment button.
- Enter a suitable description for the prepayment for purchase order and enter the prepayment value. In our case, let us assume that vendor has requested 10% prepayment.
- Enter 10% and verify that the prepayment remaining value which will be 10% of the total PO value. Note that you can also specify a fixed prepayment amount if vendors requests so.

Prepayments can be removed after it has been setup on a PO by clicking the Remove prepayment button. if business later cancels the prepayment.

*Note: The prepayment category ID is the procurement category against which the prepayment will be tracked
- Now, Confirm the purchase order after saving the prepayment details.

Posting the Prepayment Invoice:
- To do this, click the Invoice tab in the purchase order form and click Prepayment invoice button.

- Now enter invoice number and click Post > post button to post the prepayment invoice.

- Note the newly created vendor transaction and also take a note of the affected vendor balance. Recording of the prepayment invoice increases the vendor balance. In this scenario it is $4100.25(Vendor balance before prepayment invoice) + $87,720(Prepayment invoice amount).


AP Coordinator/Manager processes the required prepayment:
- It’s now AP Manager’s task to make the payment for the prepayment which was requested for the purchase order.
- Navigate to AP > Journals > create a new payment journal.
- Click payment journal line and click Functions > Settlement button and select the prepayment invoice.

- Print the check for vendor and post the payment. Make a note of the vendor transactions and the affected vendor balance also after this step. Vendor balance decreases after the payment has been made.
Settle the payment against the final invoice:
- When the goods arrive and you receive the final invoice from vendor, settle the prepayment with it.
- Navigate to Purchase order screen > Invoice tab and generate an invoice.
- Click Apply prepayment button.

- You will notice the prepayment record appearing here in this form. The “Select prepayments to apply” grid displays all the prepayments which could exist for the PO.
- Also notice the invoice amount is $877200 and available application amount is $87,720 which is 10% of the invoice which was paid as a prepayment to the vendor.

- Finally Select the prepayment and click Apply prepayment button. You will see that the “’Total amount of the prepayment that will be applied to the invoice will be 87720.$.
- Make a note that one line gets added in the vendor invoice line.

- Now, Post the purchase order invoice by clicking Post.
- With the PO invoice posted, let us now analyze the financial voucher and the impact on vendor balance.


Subscribe to:
Posts (Atom)