Monday, 12 October 2015

ONE INVOICE FOR MULTIPLE PURCHASE ORDERS IN AX 2012

Post single invoice for multiple Purchase orders

There might be a case where the vendor sends a single invoice for multiple purchase orders, in this scenario we will see how to post one invoice for multiple purchase orders of the same vendor.
We are having two PO’s for the same vendor “US- 104 Fabrikam Supplier”
PO Number        Qty         Unit Price            Net Price
000134                  10           27.25                     272.50
000135                  15           78.99                     1184.85
Consolidated Net Price for Two PO’s is 1457.35
Step 1: Select the Two Purchase Order
Navigation: Procurement and sourcing> Common> Purchase orders> All purchase orders
  • Select the Two PO’s
  • Click on the Invoice tab
  • Then click on Invoice button
PO
Step 2: Consolidate the Two Purchase orders
  • Enter the same invoice number for the two purchase orders
  • Then click on the Consolidate invoices button
  • Under the Summary update select “Invoice account”
  • Then click on the Consolidate to merge the two PO’s into one
PO Consolidate
Step 3: Total amount of the two Purchase Orders
  • The Two Purchase orders are now consolidated
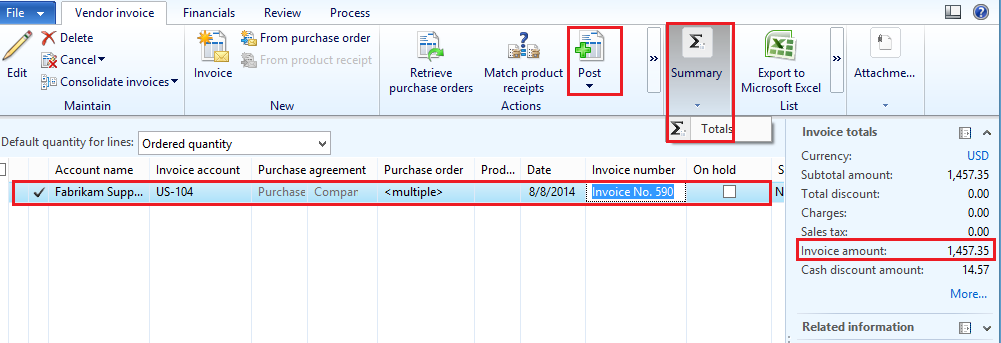
  • To check the Invoice amount – click on Summary – Totals or can view on the right side of the form
  • Click “Post” to complete the Purchase Order
PO Post
  • We can get the Print of the Invoice as shown below:
PO Print
Step 4: Verify the status of the Purchase Orders, its showing as “Invoiced”
Navigation: Accounts Payable > Common Forms > All Purchase Orders
PO Status
Step 5: Check the Vendor Invoiced entries
Navigation: Accounts Payable > Common Forms > All Vendors
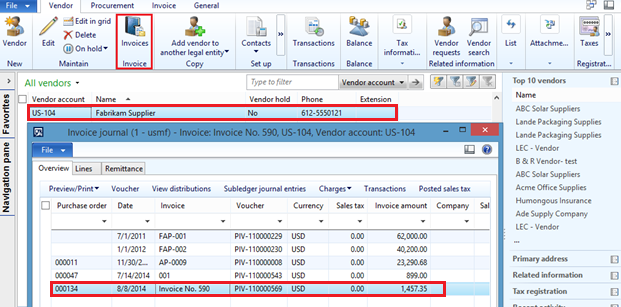
  • Select the vendor “US-104”
  • Click on Invoice button to view to posted invoices
PO Transactions

Purchase requisition workflow

This article describes how to set up in the purchase requisition workflow the approval element done by the project manager.

1/ Create a workflow Participant

Access: Procurement and sourcing > Setup > Policies > Purchase requisitions expenditure reviewers
  • Click “New” to create a new expenditure reviewer
  • Select the company
  • Select “Project Manager”
image

2/ Setup the workflow

Access: Procurement and sourcing > Setup > Procurement and sourcing workflow
In the workflow, line or header level, add a condition element to check if there is a project populated in the purchase requisition:
image
  • Click “Properties”
  • Enter a new title
  • Select the condition:
image
Add a new approval element
image

Click “Properties” and enter all the information:
  • Title
  • Notifications
  • Actions allowed
image
Go to the level down, to complete the approval step
image
  • Populate all the text required in the Basics settings
  • Click “Assignment”
  • Select “Participant”
image
In the Role base tab:
  • Select Type of participant =  Expenditure participants
  • Select participant = Project manager
image
  • Complete the time limit and the completion policy
Check that the error panel is empty and save the new version of the workflow
image
The workflow is going to refer to the project setup, to assign the approval to the project manager:
image

Warehouse Management System- Outbound Process

Outbound process is nothing but the normal Sales Order process which we will achieve now through the WMS.

Like Inbound process, we have few more set ups in Outbound Process also like Location Directives, Work Template, Wave Template and Mobile Device Menu Items which we will learn to configure in this post.
Location Directives
Location Directives are used to direct work transactions to the appropriate location in the warehouse. For example, in a Sales order transaction, a location directive determines where the items will be picked from and where the picked items will be put.
User can use location directives to do the following:
  • Put away incoming items.
  • Pick and stage items for outbound transactions.
  • Pick and put raw materials for production.
  • Replenish locations.
For setting up a Location Directive for a Sales Order, follow the below steps:
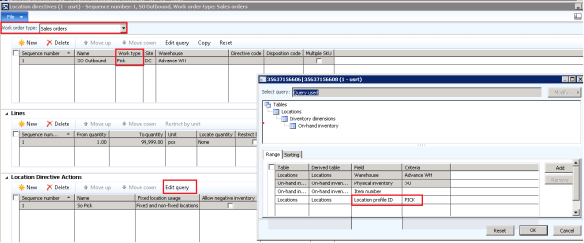
For PICK
  1. Navigate to: Warehouse Management > Set Up > Location Directives
  2. Select the Work Order type of the Location Directive form as Sales Order. Click New to create a record and select the Work type as Pick.
  3. Enter the Site and Warehouse for the Pick.
  4. Under the Lines fast tab enter the From and To quantity that will be valid for.
  5. Create a record in the Location Directive Actions fast tab and click Edit query. Under Edit query, enter the Location Profile ID from where the items will be Picked from. So the items in this case will be picked from the PICK Location.
1
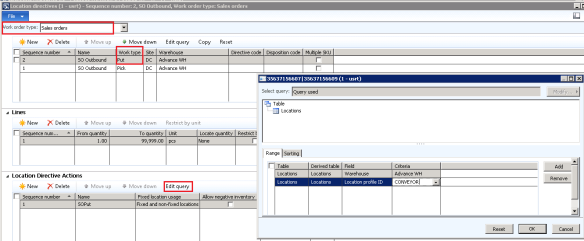
For PUT
  1. In the same form, Click New to create a record and select the Work type as Put.
  2. Enter the Site and Warehouse for the Put.
  3. Under the Lines fast tab enter the From and To quantity that will be valid for.
  4. Create a record in the Location Directive Actions fast tab and click Edit query. Under Edit query, enter the Location Profile ID where the items will be PUT. So the items in this case will be PUT to the CONVEYOR Location.
1
So in short, while the orders will be processed, this Location Directive will give a location from where the items will be Picked and the Location where to PUT.
Work Templates
A work template is used to create and process warehouse work at various stages in the warehouse management process. . For example, a sales order has been initiated, so a work item must be created for somebody to go and pick items from the defaulted receiving location and follow the location directive action to pick the item and to put the item away in a particular location.
User can use Work Templates to do the following:
  • Outbound transactions.
  • Picking of inventory items.
  • Production tasks such as picking or putting of raw materials.
  • Inventory transfers.
  • Movement of inventory items between locations.
  • Replenishment of locations.
For setting up a Work Template for a Purchase Order, follow the below steps:
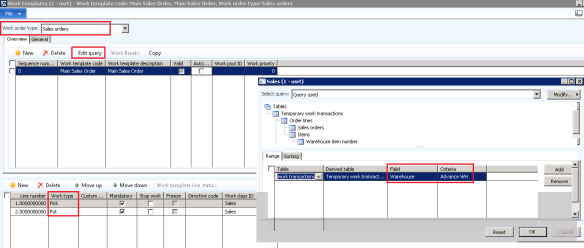
  1. Navigate to: Warehouse Management > Set Up > Work > Work templates.
  2. Select the Work Order type of the Work Template form as Sales Order. Click New to create a new record.
  3. In the Lines create two records having the work type one for PICK and another for PUT.
  4. Click Edit Query at the header to specify the Warehouse.
1

Wave Template

Wave templates are being used as a wave processing to group picking work for multiple work orders into a single wave.
This process describes to create, process, and release a wave to create picking work for a load, shipment, production order, or Kanban order. You can create waves for sales orders
  • Sales orders – Use shipping waves to include lines from sales orders. When a sales order is released to the warehouse, the sales order lines can be included in the wave.
For setting up a Wave Template for a Sales Order, follow the below steps:
  1. Navigate to: Warehouse Management > Set Up > Wave > Wave templates.
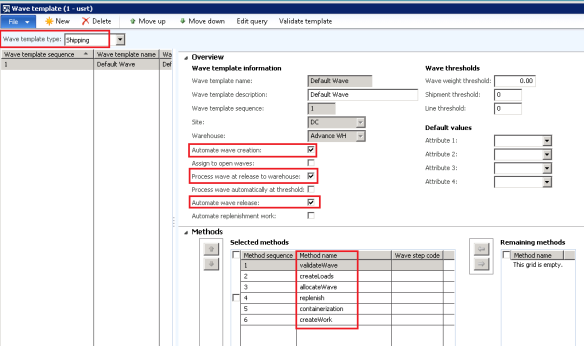
  2. Select the Wave Template type as Shipping. Click New to create a new record and enter a Wave name, Site and Warehouse.
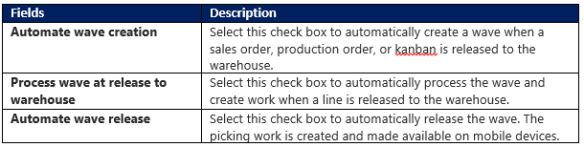
  3. Click the check boxes- ‘Automatic Wave Creation’, ‘Process Wave at Release to Warehouse’ and ‘Automate Wave Release’.
1
4. Make sure that you have selected All the Methods by selecting them from Right to             Left.
1
Mobile Device Menu Items
Mobile device needs to be set for the particular user so that the user can use his/her mobile device to perform the work For Outbound, only one set up needs to be done-
  1. Sales Picking
Sales Picking
Follow the below steps to create a Sales Picking in Mobile Device-
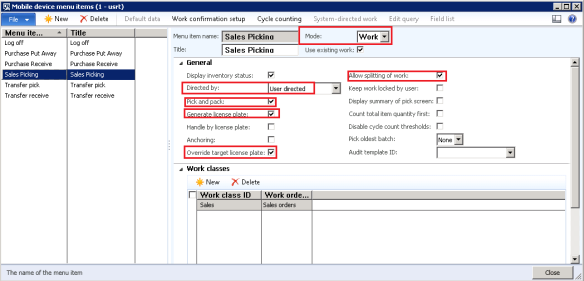
  1. Navigate to:Warehouse Management > Set Up > Mobile Device > Mobile Device Menu Items.
  2. Click New to create a record.
  3. Select type as Work under Mode.
  4. In Directed by, select user directed.
  5. Select the Pick & Pack,Generate License plate, Override target LP&  Allow Splitting of Work check box checked.
1
Mobile Device Menu 
Once the Mobile device menu items has been created, its time to attach these Menu items into the menu.
Navigate to: Warehouse Management > Set Up > Mobile Device > Mobile Device Menu.
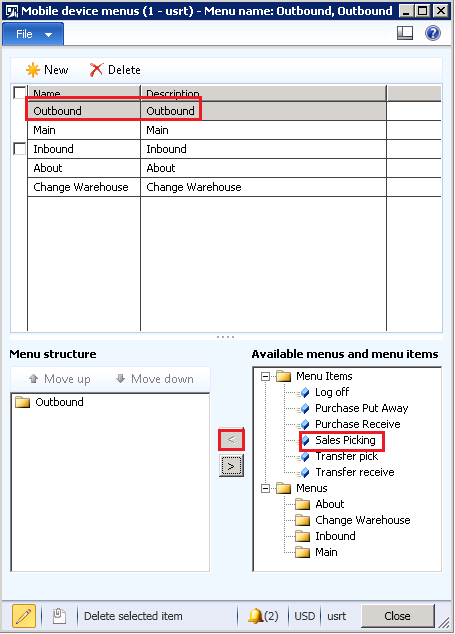
Click New and enter the name as Outbound. Under Outbound,move these menu items from right to left (Sales Picking). So these items will be displayed at the time of log in.
1
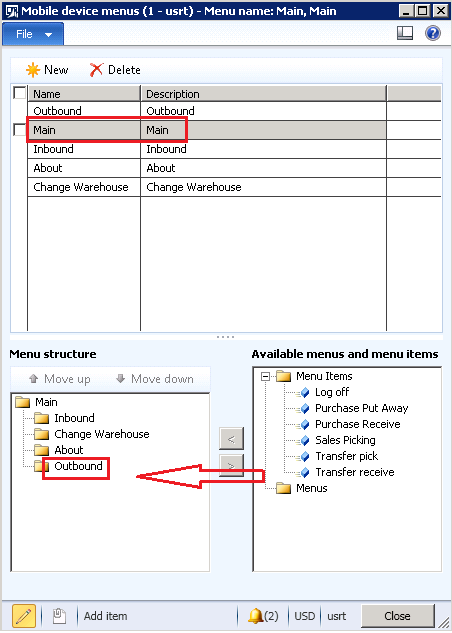
And Later, select this Outbound into the Main Menu.
1
Now we are done up with all the set ups that are needed for the Outbound process. Now it’s time to process the Sales order by WMS.
Follow the below steps for the Inbound Process-
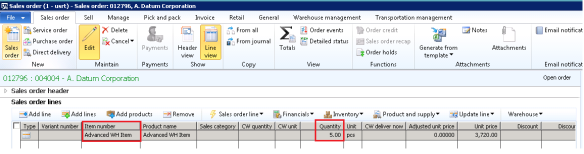
  1. Create a Sales Order. Make sure that you have taken the Item as advanced warehouse item and warehouse as advanced warehouse.
1
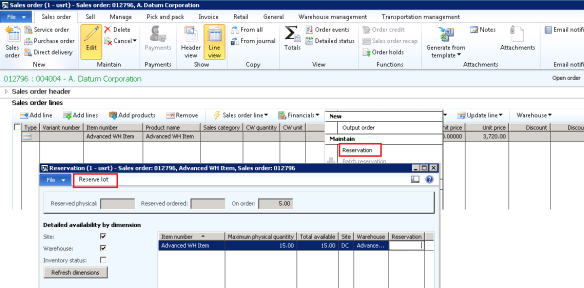
2. Click Inventory > Reservation to reserve the items. Under Reservation form, click            Reserve lot to reserve the items.
1
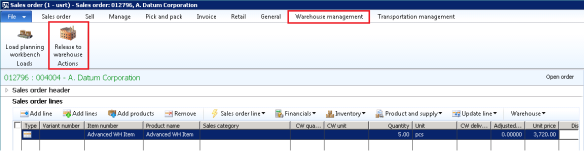
3. Navigate to Warehouse Management tab of the sales order and then click ‘Release to Warehouse’ button.
1
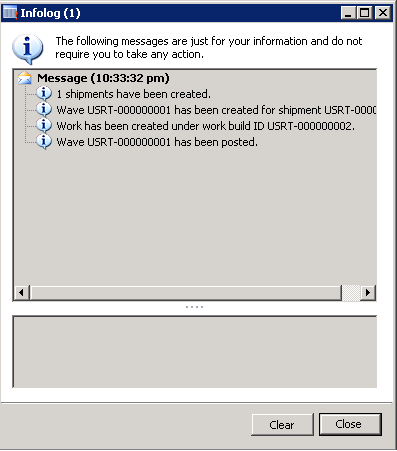
4. Release to Warehouse leads to the creation of – Wave ID, Work ID and Shipment ID.
1
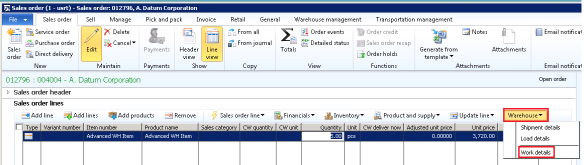
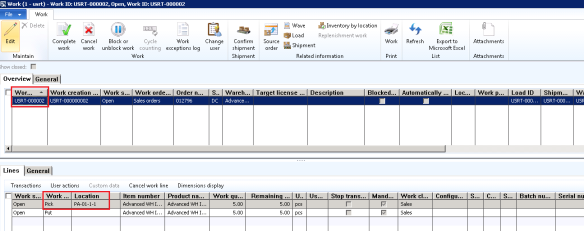
5. Navigating to the sales order to get the Work ID that has been created.
1 1
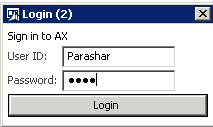
6. User will log into the Mobile device.
1
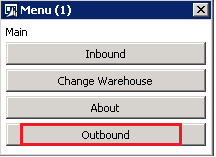
7. After Log in, user needs to click on the Outbound Button.
1
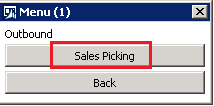
8. Click on Sales Picking to proceed.
1
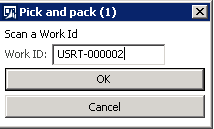
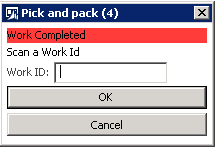
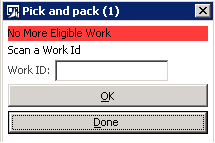
9. Scan with the Work ID that has been generated.
1
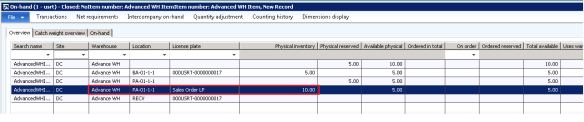
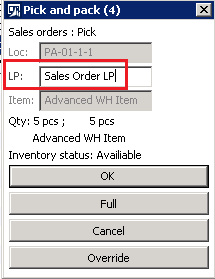
10. System will automatically take the Location. At this time, system will ask for a License Plate to enter. Take the LP from the Item’s on-hand form.
1
1
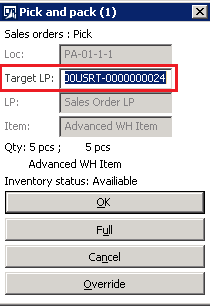
11. System will take the Target LP automatically.
1
12. Click Done to Continue.
1
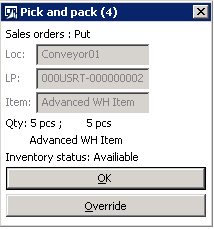
13. System will ask to scan a Location. Enter Conveyor01 (This is one of the location I made manually in the Locations form under the Location Profile ID as Conveyor) to it and Click OK.
1
14. Click OK to complete the Work.
1
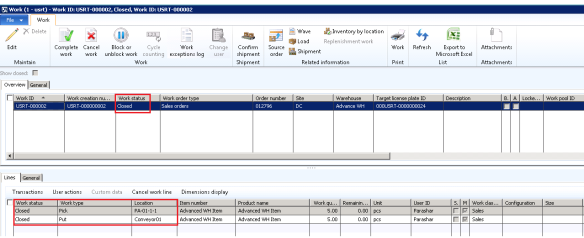
15. Now navigate to the same work details. The status of the work gets closed.
1
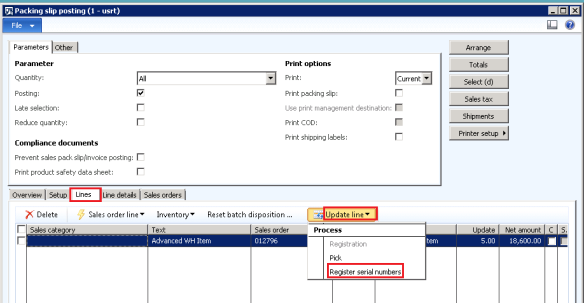
16. Since the item is a serialized item, so need to enter the serial number. Go to the Lines tab of the Packing Slip form and click Register Serial number.
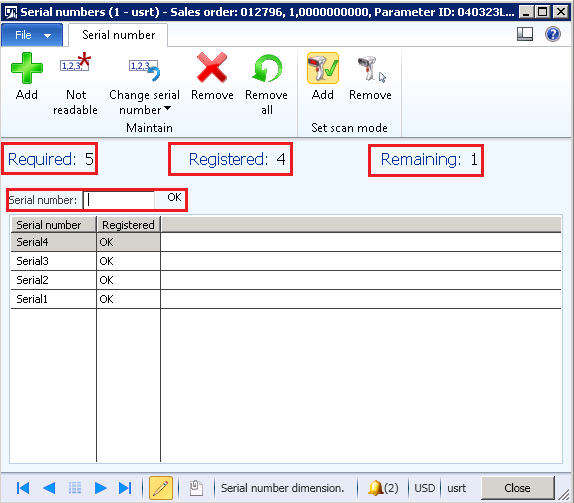
1
17. Enter the serial numbers manually by entering them and clicking Enter. By this way fill all the serial numbers.
1
Once the Serial numbers has been entered, user can do the Packing Slip.

Thursday, 8 October 2015

Export Purchase Order Data to MS Excel template with Dynamics AX 2012 ( Document Management )


Often, the customer asked to modify the layout of the standard reports to meet existing templates or tastes. and as we all know that changing the layout in the SSRS reports will take long time. Instead we can use one of the Dynamics AX functionality to export the customer data to MS Excel Template in simple way and short time.  
The Document management functionality in Microsoft Dynamics AX give you the ability to attach files to records. For example, you can attach PDF, Microsoft Word, or Microsoft Excel files to a purchase order or a sales order. You can also fill data to MS Excel and MS Word templates from Microsoft Dynamics AX data. 


This Article will discuss how to use MS Excel template rather than customize the standard SSRS reports in Dynamics AX 2012. 

In the following sections we will discuss how to export data from Microsoft Dynamics AX Purchase order to MS Excel templates.

This article divided into three parts.
  • Prerequisites (Step by step with screenshots )
  • Setup (Step by step with screenshots )
  • Implementation (Step by step with screenshots )

Prerequisites:                                                            
Create purchase Order Template by following these steps:

  1. Open new Microsoft Excel document ( I use Office 2010)
  2. design the Purchase Order layout (Add company logo, Report header,report label).To simplify the subject I will add a few labels as follow:
    • Purchase Order No.
    • Vendor Name
    • Item Code
    • Description
    • Qty
    • Unit Price

  3. Add Hyperlink to each Label ( Hyperlink will be used to map the Purchase order fields to the MS Excel template )
    1. The Following Screenshot illustrate how to add the Hyperlink to the template field. for example in the following screenshot I added a new hyperlink which referee to cell B9 where the purchase order number will be placed

    2. Repeat step 3 to create new hyperlink for each field. in my case I am going to add 6 hyperlinks for (Purchase Order No.,Vendor Name, Item Code, Description, Qty, Unit Price)
    3. Save the Excel file as Excel 97-2003 Template

Setup:                                                                           
  1. Go to Organization Administration > Setup > Document Management > Document Management Parameter
  2. Click the number sequence Tab > Assign  number sequence to the Document file counter
  3. Click the File types Tab > Click Add Button > Add the Microsoft word template file type if not exist and close the screen

  4. Go to Organization Administration > Setup > Document types
  5. Click new and follow the steps in the following screenshot to add new document type

  6. Click the Option Button


  7. from the Table drop down list select the "PurchTable"

  8. in the template file field click the folder icon and select the Sales order template that we create before
     
  9. Go to the Field Tab

  10. in the data field select the "PurchaseId" (this field contain the Purchase Order Number/Code)

  11. in the bookmark field write the Hyperlink name Which corresponds to "PurchaseId" in this case write "Sheet1!B9"

  12. repeat steps from 10 to 11 with all fields that you want to export and link it to the  corresponds Hyperlink ( make sure to select the "PurchLine" table in the Data Table Filed before mapping the Purchase Order line fileds to the  corresponds  hyperlink see the orange rectangle)

Implementation:                                                      

  1. Go to > Account Payables > Common--> purchase Order > All purchase Orders
     
  2. Select any purchase Order and Click the Attachment Button

  3. Click the New Button and Select the Workbook

  4. the System will start the export process

  5. New document will be created and the Purchase Order Data will be populated  automatically.

  6. that's all. Cool :)