Wednesday 22 April 2015

Charges Codes in AX 2012

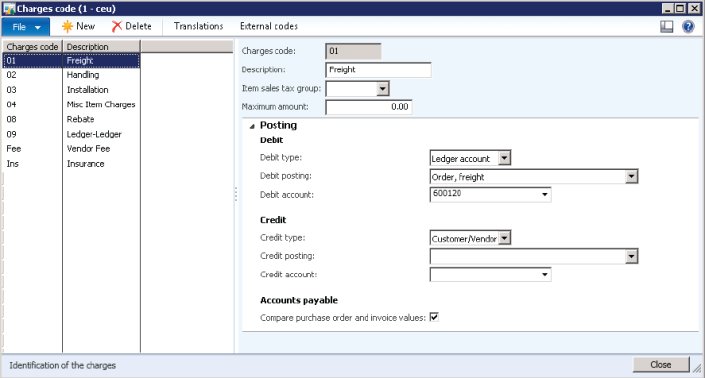
Before you plan to add manual or automatic charges when you create a sales or purchase order, you must setup Charges Codes. They are used to define the kind of charge and how the charge is going to be debited or credited. You can setup charges by navigating to Setup → Charges → Charges codes in the following 3 modules:
1. Accounts Receivable
2. Accounts Payable
3. Procurement and Sourcing
Untitled

Fields on the Charges codes form are described below:
1. Charges code: Unique code for the charge
2. Description: Brief description about the charge
3. Item sales tax group: An item sales tax group that can be used for calculating taxes on the charge
4. Maximum amount: Maximum amount allowed for the charge

Posting FastTab

Untitled
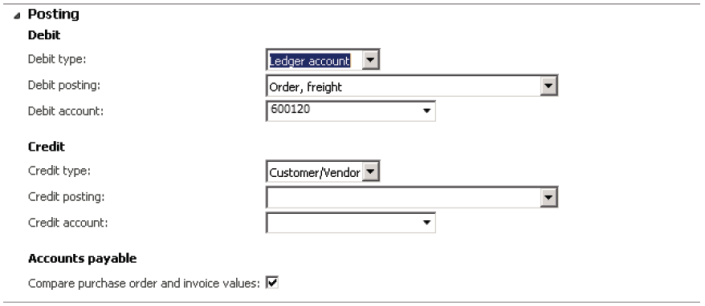
This is where the actual game happens. In this posting fastTab we define how to automatically debit and credit the charge. Both debit and credit sections have the following fields:
1. Type – Defines the entity which will be billed for the charge. Following are the available options:
  • Item – Charge is added to the item cost
  • Ledger Account – Charge is billed internally to the ledger account
  • Customer/Vendor – Charge is billed to the customer/vendor
2. Posting – Free text field to give the description which will be used while posting the charge to journals
3. Account - Defines the ledger account which must be debited/credited when Type is set to Ledger Account

So far we have understood what is the purpose of different parameters used to configure charges codes. Let us now create charges codes for sales and purchases. In both cases the parameters discussed will be set differently to cater to different needs of sales and purchases.

Charges Codes for Sales

For sales, you can configure charges in 2 different ways:
1. Customer
Charge is billed to the customer and is added to the sales order totals. Follow the steps below to achieve this functionality:
1. Open Accounts receivable > Setup > Charges > Charges code.
2. Click New to add a new code.
3. In the Charges code field, type a unique identifier for this charge.
4. In the Description field, type a short description of the charge.
5. Click the Item sales tax group arrow and select the sales tax group.
6. Click the Posting tab.
7. Setup the debit/credit fields as follows:
DebitTypeCustomer/Vender
PostingN/A
AccountN/A
CreditTypeLedger Account
PostingSpecify
AccountSpecify

2. Ledger Account (Internal)
Charge is billed to an internal ledger account and does not show up on sales transactions. Follow the steps below to achieve this functionality:
1. Open Accounts receivable > Setup > Charges > Charges code.
2. Click New to add a new code.
3. In the Charges code field, type a unique identifier for this charge.
4. In the Description field, type a short description of the charge.
5. Click the Item sales tax group arrow and select the sales tax group.
6. Click the Posting tab.
7. Setup the debit/credit fields as follows:
DebitTypeLedger Account
PostingSpecify
AccountSpecify
CreditTypeLedger Account
PostingSpecify
AccountSpecify

 Charges Codes for Purchases

For purchases you can configure charges in 4 different ways. Repeat the following basic steps for all of the 4 different configurations then we’ll see how to setup the Posting fastTab:
1. Open Accounts payable > Setup > Charges > Charges code.
2. Click New to add a new code.
3. In the Charges code field, type a unique identifier for this charge.
4. In the Description field, type a short description of the charge.
5. Click the Item sales tax group arrow and select the sales tax group.
6. Click the Posting tab.
Here are the 4 different configurations for the posting fastTab
1. Paying to Creditor – Billing to Item
Setup the debit/credit fields as follows:
DebitTypeItem
PostingN/A
AccountN/A
CreditTypeCustomer/Vendor
PostingN/A
AccountN/A

2. Paying Internally – Billing to Item
Setup the debit/credit fields as follows:
DebitTypeItem
PostingN/A
AccountN/A
CreditTypeLedger Account
PostingSpecify
AccountSpecify

3. Paying to Creditor – Billing Internally
DebitTypeLedger Account
PostingSpecify
AccountSpecify
CreditTypeCustomer/Vendor
PostingN/A
AccountN/A

4. Paying Internally – Billing Internally
DebitTypeLedger Account
PostingSpecify
AccountSpecify
CreditTypeLedger Account
PostingSpecify
AccountSpecify

Process Prepayment in AX 2012

Purchasing agent creates the purchase order and submits a request to AP coordinator to process prepayment:
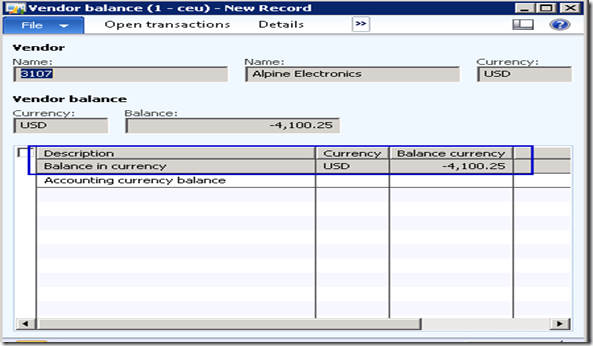
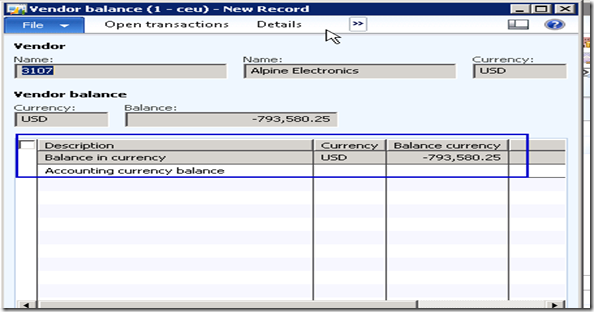
  • Create a new purchase order under Accounts Payable module for vendor 3107, Alpine Electronics. Let us make a note of their balance before we proceed with a prepaid PO processing for them.
image
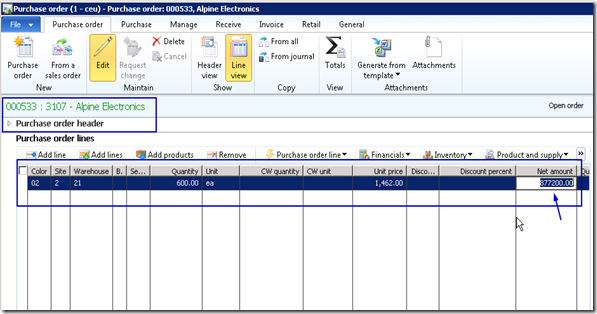
  • Create purchase order header and PO line for item(1001) for 600 quantity.
image
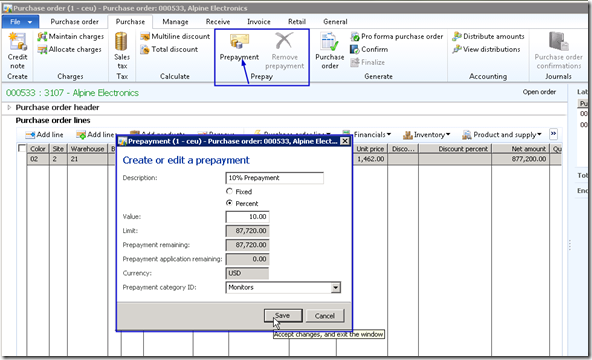
  • Click the Purchase tab and click Prepay > Prepayment button.
  • Enter a suitable description for the prepayment for purchase order and enter the prepayment value. In our case, let us assume that vendor has requested 10% prepayment.
  • Enter 10% and verify that the prepayment remaining value which will be 10% of the total PO value. Note that you can also specify a fixed prepayment amount if vendors requests so.
image
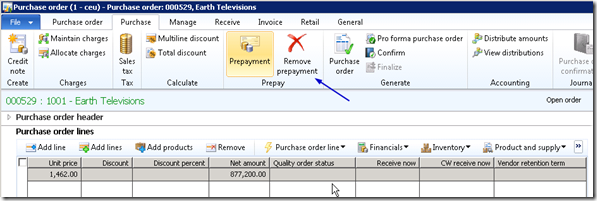
Prepayments can be removed after it has been setup on a PO by clicking the Remove prepayment button. if business later cancels the prepayment.
image
*Note: The prepayment category ID is the procurement category against which the prepayment will be tracked
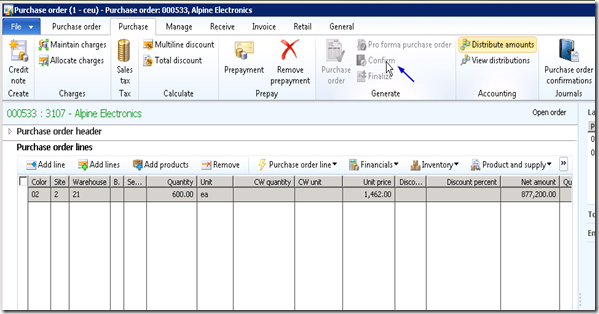
  • Now, Confirm the purchase order after saving the prepayment details.
image
Posting the Prepayment Invoice:
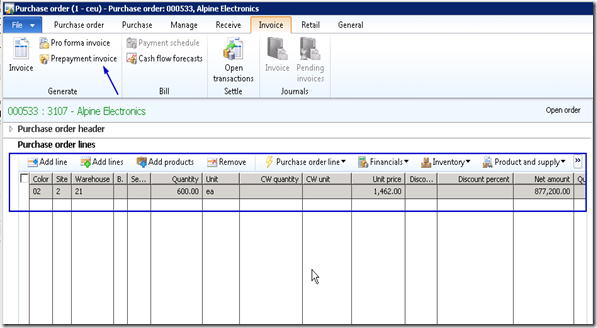
  • To do this, click the Invoice tab in the purchase order form and click Prepayment invoice button.
image
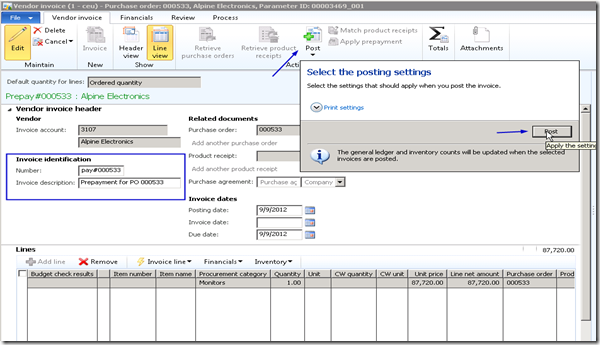
  • Now enter invoice number and click Post > post button to post the prepayment invoice.
image
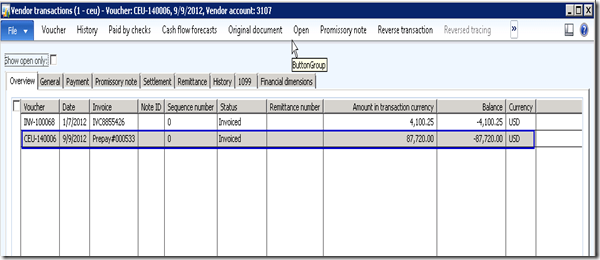
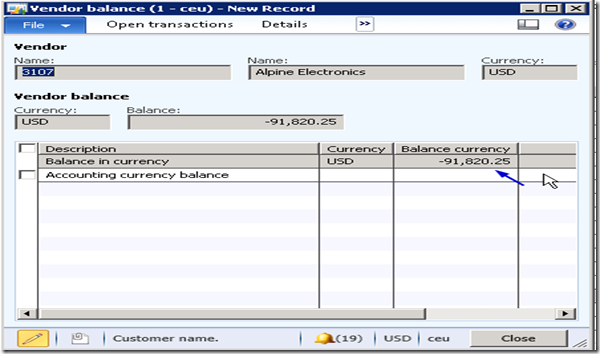
  • Note the newly created vendor transaction and also take a note of the affected vendor balance. Recording of the prepayment invoice increases the vendor balance. In this scenario it is $4100.25(Vendor balance before prepayment invoice) + $87,720(Prepayment invoice amount).
image
image
AP Coordinator/Manager processes the required prepayment:
  • It’s now AP Manager’s task to make the payment for the prepayment which was requested for the purchase order.
  • Navigate to AP > Journals > create a new payment journal.
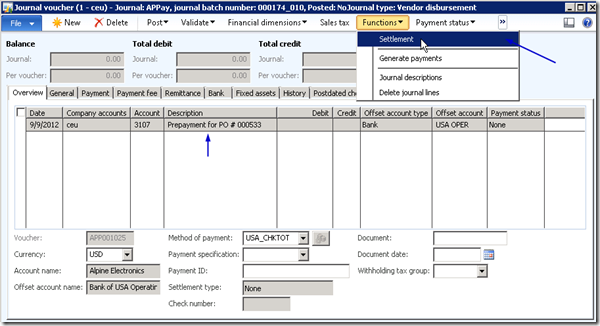
  • Click payment journal line and click Functions > Settlement button and select the prepayment invoice.
image
  • Print the check for vendor and post the payment. Make a note of the vendor transactions and the affected vendor balance also after this step. Vendor balance decreases after the payment has been made.
Settle the payment against the final invoice:
  • When the goods arrive and you receive the final invoice from vendor, settle the prepayment with it.
  • Navigate to Purchase order screen > Invoice tab and generate an invoice.
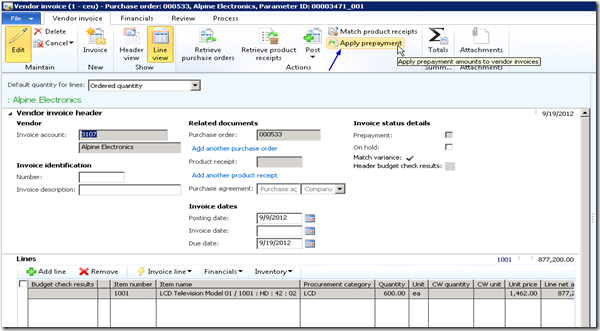
  • Click Apply prepayment button.
image
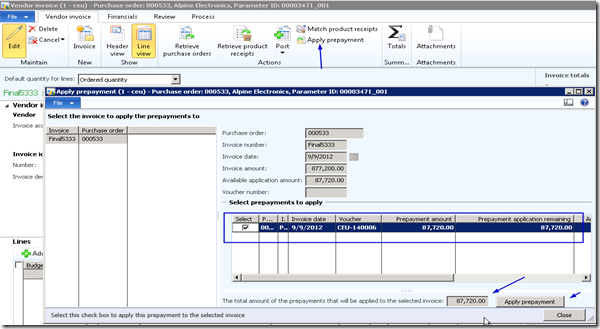
  • You will notice the prepayment record appearing here in this form. The “Select prepayments to apply” grid displays all the prepayments which could exist for the PO.
  • Also notice the invoice amount is $877200 and available application amount is $87,720 which is 10% of the invoice which was paid as a prepayment to the vendor.
image
  • Finally Select the prepayment and click Apply prepayment button. You will see that the “’Total amount of the prepayment that will be applied to the invoice will be 87720.$.
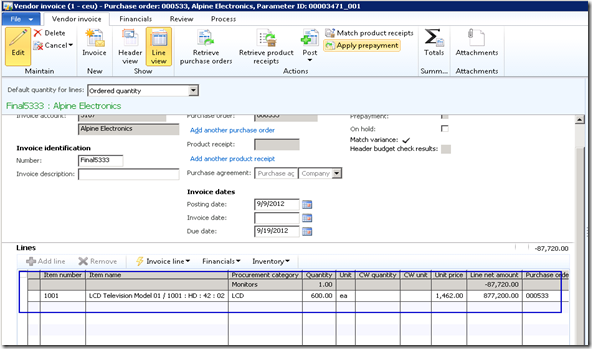
  • Make a note that one line gets added in the vendor invoice line.
image
  • Now, Post the purchase order invoice by clicking Post.
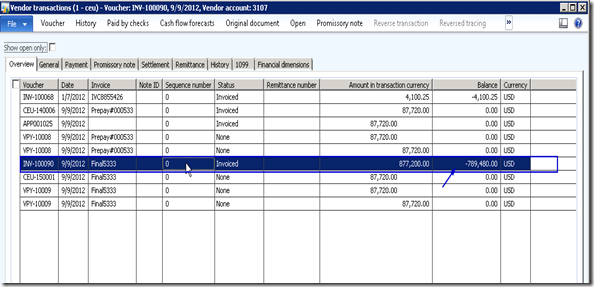
  • With the PO invoice posted, let us now analyze the financial voucher and the impact on vendor balance.
image
image

Delete return order

Use the Delete return order form to delete multiple return orders.
  1. Click Sales and marketing > Periodic > Clean up > Delete return orders.
  2. Click Select to open the Sales update form.
  3. Specify the criteria, and then click OK to return to the Delete return order form. Return orders that have been created in the legal entity are displayed, based on the specified criteria.
  4. Select the return order line to delete, and then click OK.
  5. Click Yes to delete the return orders.

Inventory Model Group’s Check Boxes in AX 2012

I am not going to the definition of the item model group; hope that all of us know that. Let us now discuss each of the check boxed one by one. I will try to explain each of them in easy words. Below is the screen shot of the Item model Group form:-

1
Let’s start with the left hand side from the top:-
  • Stocked Product
If checked then the product will be tracked in the inventory (if that product has the same Item Model Group attached) and if unchecked it will not be tracked in the inventory. More specifically, if Stocked Product check box is checked then Inventory à Transaction will be displayed and if not then the Inventory à Transaction will be grayed out.
If Stocked Product check Box = Checked
2
If Stocked Product check Box = Not Checked
3
  • Physical Negative Inventory
If checked, the system will allow you to do an issue of an item even if you don’t have any stock for that item in the inventory. For example, you have an Item X, whose quantity is 0. You can do the packing slip (Deliver) of that item in a Sales order or a packing Slip of an item in a Return Purchase Order.
If the check box is unchecked, the system will through an error.
Physical Negative Inventory = Unchecked
4
Note: Item’s on hand = 0 and Physical –ve inventory= Unchecked.  Now raised a SO. Confirmed it and doing the Packing Slip. As discussed above, system will through an error.
5
Physical Negative Inventory = Checked
Note: Item’s on hand = 0 and Physical –ve inventory= Checked.  Now raised a SO. Confirmed it and doing the Packing Slip. As discussed above, system will allow in doing the Packing Slip.
6
  • Financial Negative Inventory
If checked, the system will allow you to raise a Sales Order and directly Invoice while bypassing packing Slip only if the available physical quantity having status receipt as Received or Purchased. Means at least your available physical quantity should be physically posted.
If unchecked, system will not allow you to do the invoice even if all the items in the order are physically updated.
Financial Negative Inventory = Checked
Giving an example, if you raised a Sales Order of 10 items and you have available physical of 6 items then the system will allow you to do the invoice of only these 6 items and not the remaining 4 items without doing the packing slip. I have physical quantity of 6 items of this SO, so while doing the Invoice for all the 10 items, system throws me error as below-
7
But while doing the invoice for 6 items, system allowed me to do the same.
8
  • Quarantine Management
If checked, system will create a Quarantine Order automatically while receiving (doing Packing Slip) a Purchase order. That means, all the items will come at your quarantine warehouse for checking before coming to your main warehouse.
If unchecked, system will not create any Quarantine Order automatically and the items will be received at the respective warehouse only.
Quarantine Management = Checked.
System has created a Quarantine Order as soon as the receiving has been done.9
  • Registration Requirement
If checked then it becomes mandatory to register the products before the packing slip is made. In other words, the inventory transaction status must be made to Registered before the receipt or delivery is processed.
If unchecked, then no registration of the products is required before the packing slip.
1
Created a PO and going to receive it. System automatically restricts from making the packing slip and an error has generated.
2
  • Receiving Requirement
If checked, an icon in the Product Receipt Quantity match column of the Vendor Invoice form displays, whenever there is a difference between the received quantity in the packing slip and the invoice quantity in the Invoice.
If unchecked, then no icon displays.
NOTE: Icon will be displayed only your order is having the Matching Policy of Three Way Matching
Example: Let us create a Purchase order of 10 quantity and receive the PO with 6 quantity. The PO is under Three Way Matching. Let’s Invoice the Order by 10 quantity.
3
As mentioned, A receipt og 6 quantity has been made.
4
Now Invoicing for 10 quantity.
5
For the remaining check boxes I will discuss on my next blog. Till then keep DAXin

Tuesday 21 April 2015

Understanding of inventory models in Ax 2012


IM Type


In the following example, we can understand how the cost price calculation happens for each of inventory model selection scenario. Here we have 3 receipt transaction with different cost price and an issue transaction in between;
Calculation


Inventory Valuation Methods Introduction


Inventory valuation methods are used to calculate the cost of goods sold and cost of ending inventory. Following are the most widely used inventory valuation methods:
  1. First-In, First-Out Method
  2. Last-In, First-Out Method
  3. Average Cost Method

First-in-First-Out Method (FIFO)

According to FIFO, it is assumed that items from the inventory are sold in the order in which they are purchased or produced. This means that cost of older inventory is charged to cost of goods sold first and the ending inventory consists of those goods which are purchased or produced later. This is the most widely used method for inventory valuation. FIFO method is closer to actual physical flow of goods because companies normally sell goods in order in which they are purchased or produced.

Last-in-First-Out Method (LIFO)

This method of inventory valuation is exactly opposite to first-in-first-out method. Here it is assumed that newer inventory is sold first and older remains in inventory. When prices of goods increase, cost of goods sold in LIFO method is relatively higher and ending inventory balance is relatively lower. This is because the cost goods sold mostly consists of newer higher priced goods and ending inventory cost consists of older low priced items.

Average Cost Method (AVCO)

Under average cost method, weighted average cost per unit is calculated for the entire inventory on hand which is used to record cost of goods sold. Weighted average cost per unit is calculated as follows:
Weighted Average Cost Per Unit= Total Cost of Goods in Inventory
Total Units in Inventory
The weighted average cost as calculated above is multiplied by number of units sold to get cost of goods sold and with number of units in ending inventory to obtain cost of ending inventory.

Friday 17 April 2015

Catch Weight Functionality for Receiving of Goods in Microsoft Dynamics AX 2012

Many industries receive raw material in a different packaging unit, while payment may be made in a different unit. This post will help you understand how to receive product in different packaging using Catch Weight. Let’s take an example of cotton in Textile Industry, Cotton is received in unit “Bales” and normally companies need to pay the vendor after weighing in Kilograms. This weight may be different in each case because the Bale has a catch weight. Users face great difficulties while receiving goods because in AX 2012 we can give only one Unit of Conversion against single item. Lets have a look on how to resolve this:

First of all go to Product Information Management –> Common –> Released Product then click on New
Do not forget to mark CW Product Check Box while creating new Product
CW
Then click OK button and you can see the New Product in Product Information Management

New Item
Define unit of conversion of Product; remember that we have taken Inventory and Purchasing unit “KG”
Unit of Conversion
UOC
After setting unit of conversion go to the Product and edit that then go to Manage Inventory tab and select catch weight unit as Bales
Edit Prduct
and add minimum and maximum quantity to be received. Note that minimum and maximum quantity will be the quantity to be received in Kilograms not bales
Setups have been done. Now, we need to receive the same Product for this follow the below navigation
Go to Procurement & Sourcing –> Common –> Purchase Orders –> All Purchase Orders then click on New PO
PO
Select vendor and click Okay
Then select the Product on Purchase order lines
PO Lines
After taking Product and its quantities click on Update Line tab and select Registration
Update Line
This will be done after confirmation of Purchase order and before Receiving of Goods but at this stage user must know the actual weight of the Product which user is going to receive.
Now click on Auto create
Auto Create
After clicking on Auto Create checkbox, the total quantity of that Product will copy in Register now
Now user can register the actual weight of the goods received. Let’s say we have set the conversion from Bales to Kilograms 150 kg but at the time of receiving when Product was measured on weighing bridge user came to know that actual conversion is 1 Bale = 200 kilograms then here user will register the quantity with actual weight even batch number wise
Batch Wise registeration
But registration is only based on minimum and maximum quantities setup on Catch Weight you can see in the above screen shot that setup conversion was 150 kilogram but registration has been done with 200 kilograms conversion
After this go to the Product Receipt for receiving the Product
Product Receipt 1
Enter Product Receipt number
Product Receipt 2
In above Posting Product Receipt screen you can see on lines The CW quantity remains same but conversion factor has been changed from 150 kg conversion to registered 200 kg conversion
Now click Ok for receipt.
Now you can check “On Hand” inventory will show the inventory of received product
On Hand
You can see the receiving of goods in different batches with actual weight of the Product received.