Saturday 28 March 2015

purchase agreement

A purchase agreement is a contract that commits an organization to buy a specified quantity or amount by using multiple purchase orders over time. In exchange for this commitment, the buyer receives special prices and discounts. The purchase agreement can apply to a specific quantity of a product, a specific currency amount of a product, or a specific currency amount of the products in a procurement category. The prices and discounts of the purchase agreement override the prices and discounts that are specified in any trade agreements that exist.

In the Purchase agreements form, you can create, apply, and follow up on purchase agreements that exist between your organization and your vendors. For example, after you create a purchase agreement, you can order directly from it.

Every purchase agreement has a validity period that is defined by the person who creates the purchase agreement. The delivery date of a purchase must be in the effective dates of the validity period.

By default, a purchase agreement is on hold. You must change the status of the purchase agreement to Effective before you can create a purchase order for the purchase agreement.

Commitment types
Each line in a purchase agreement is a commitment to buy something. You can use lines from multiple purchase orders to fulfill the commitment. There are four types of commitments:

Product quantity commitment – You purchase a specific quantity of a product.
Product value commitment – You purchase a specific currency amount of a product.
Product category value commitment – You purchase a specific currency amount in a procurement category. The amount can be for a catalog item or a non-catalog item.
Value commitment – You purchase a specific currency amount of any product or in any procurement category.

ImportantImportant
The commitment type, which only specifies whether the purchase agreement is based on a value or a quantity, differs from the commitment document that is used by public sector entities in France. For more information about commitment documents, see (FRA) About commitments (Public sector).

Pricing terms for purchase agreements
Pricing terms can vary, depending on the type of commitment. The pricing terms from purchase agreements override any other pricing terms that are set up for trade agreements.
The following table describes the price-related fields that are affected by each commitment type. Fields that contain Yes can be updated on an order line.

Commitment type
Unit price
Price unit
Discount percent
Cash discount amount
Product quantity commitment
Yes
Yes
Yes
Yes
Product value commitment
Yes
Product category value commitment
Yes
Value commitment
Yes

Policies for purchase agreements
The following policies affect the way that the link between a purchase agreement commitment and the corresponding purchase order lines works:

Max is enforced – The total quantity or amount for all order lines cannot exceed the quantity or amount that is specified on the related commitment.

Price and discount is fixed – The price on an order line and the price on the related commitment cannot differ. If the price is changed on the order line, the link to the commitment is broken. If the link is broken, the order line does not contribute to the fulfillment of the commitment.

Minimum release amount and Maximum release amount – If an amount is specified, a message is displayed if you make any change to an order line that causes the order line to be different from the related commitment.

Fulfillment calculations for purchase agreements
The Fulfillment tab on the Line details FastTab in the Purchase agreements form displays fulfillment quantities and amounts.
In the Fulfillment area, you can view the total quantities and amounts for all order lines that are linked to the specified purchase agreement. You can also view the remaining amount or quantity that is required to fulfill the commitment.

In the Agreement area, you can view the quantities and amounts from the specified purchase agreement. These quantities and amounts are the total quantities and amounts that were committed.

Tuesday 24 March 2015

CHANGING CUSTOMER FROM ORGANIZATION TO PERSON IN AX 2012

When creating a customer in Microsoft Dynamics AX 2012, you can select a record type Organization or Person. When you forget to check this field, an error is made easily. So how can we correct this? This post will guide you to change the customer from Organization to Party or vice versa. It also applies to other entities like vendors.
Suppose a person created Ronald Trump as Organization by accident. Because this customer already has some transactions it is not possible to delete this record and create a new one.
ChangeParty1
How to change the record type?
Navigate the menu to Home/Area page. You can open the Global address book and create a new Party. Set the record type to Person.
ChangeParty2
Then go to the customer details form. Select the record which you want to change. In this case it is Ronald Trump. Click the button Change party association on the action strip you can find on the fast tab General.
In the New party record field, select the new Ronald Trump record.
ChangeParty3
You have to confirm this action.
ChangeParty4
Now Ronald Trump is associated with an Address book record with the type Person.
ChangeParty5
You can delete the old Global address book record if there are no other roles attached to it.

Thursday 19 March 2015

Allocation of Miscellaneous Charges By Purchase Order Line


Allocate miscellaneous charges is a scenario where an organization wants to add some extra fees to an item value without modifying the itempurchase price.
Microsoft Dynamics AX 2012 allows to allocate miscellaneous charges by line of a purchase order. For example, if some items on the purchase order were picked up at the vendor’s location and others were delivered, we can allocate the delivery charges only to the items that were delivered. This functionality was not available in Microsoft Dynamics AX 2009.
After we complete this exercise, we will be able to:
  • Allocate Charges to line items.
The following will demonstrate this functionality:
  1. From the Purchase Order form, we have a Purchase Order that has 3 line items.Screen Shot 2014-12-05 at 10.12.29 AM
    Figure 1 – Purchase Order Lines form
  2. From the Purchase action pane, click on Maintain charges to display the Charges transactions formScreen Shot 2014-12-05 at 10.12.53 AM
    Figure 2 – Purchase Tab
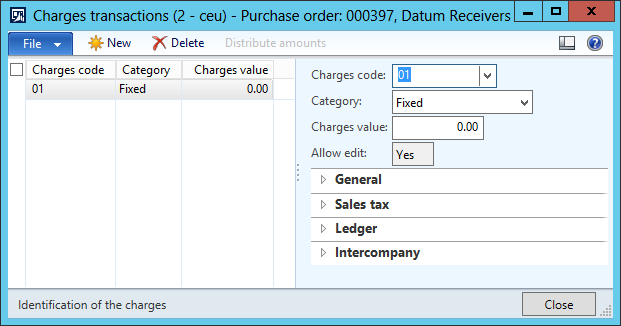
  3. In the Charges code field, select a code.
  4. In the Charges value field, type a value.
    Screen Shot 2014-12-05 at 10.13.01 AM
    Figure 3 – Charges Transaction Form
  5. Click Close to close the Charges transactions form.
  6. In the Purchase action pane, click on Allocate charges.
    Screen Shot 2014-12-05 at 10.13.09 AM
    Figure 4 – Purchase Tab
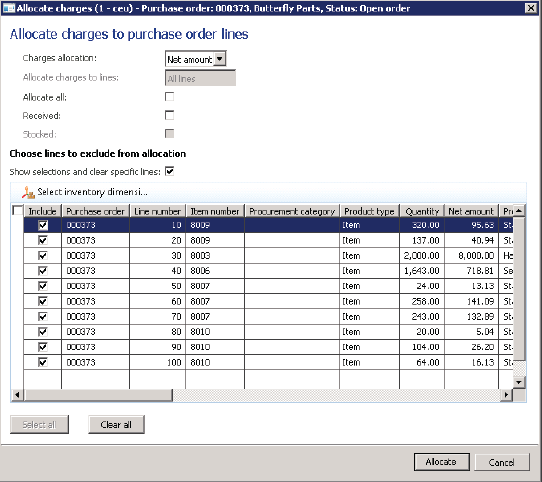
  7. Select Per Line in the Charges Allocation field also select the Allocate all checkbox.
  8. Select the Show selections and clear specific lines check box.
    Screen Shot 2014-12-05 at 10.13.18 AM
    Figure 5 – Allocate charges form
  9. Clear the check box of the first line item and then press Allocate.
  10. This will allocate the 250 USD across the second and third line evenly. Both items will receive a 125 USD charge for Installation.
  11. To view this charge on the line item, click Financials from the Purchase order lines fast tab and then click on Maintain charges.
    Screen Shot 2014-12-05 at 10.13.26 AM
    Figure 6 – Charges transactions form

Allocation of Miscellaneous Charges

Once you have setup Charges Codes, you can add manual charges to Sales Order (SO) or Purchase Order (PO). The question is why do we need to add charges manually to orders if we have the auto charges functionality? Typically we add manual charges to an order if it is not a regular one, which needs some eccentric charges to be addressed. An example could be expedited orders which need to be shipped before standard delivery times. In this case we may need to charge additional amount for freight. This is where Manual Charges come to play their role.

Manual Charges for Sales Order:

Manual charges can be added to either the SO header, individual line items or both the header and the line items. To setup the manual charges to:
1. SO header, navigate to Sell tab → Charges to open Charges Transactions Form.
2. SO lines, navigate to Financials → Maintain Charges to open Charges Transactions Form.
Untitled
The fields of Charges Transactions form are described below:
FieldDescription
Charges codesSelect Charge code. For more details read the full post Charges Codes
Transaction textText defined in the description of the charge code
CategoryDescribes how the charges are calculated:
  1. Fixed charges
  2. Charge for each unit
  3. Percentage of the line amount
  4. Intercompany (used for intercompany trade)
Charges valueEnter the amount for this charge. It can anyone of the following depending on the category selected:
  1. Fixed amount
  2. Percentage of the order or line total
  3. Fixed amount for each unit
CurrencyDefaulted from the currency of the selected charge code
KeepIndicates whether the charges transactions must be retained after partial invoicing or not

Manual Charges for Purchase Order:

Similarly, we can add charges manually to PO header or PO lines or both depending on the scenario. To setup the manual charges to:
1. PO header, navigate to Purchase tab → Manage Charges to open Charges Transactions Form.
2. PO lines, navigate to Financials → Maintain Charges to open Charges Transactions Form.
You can see the description of Charges Transactions Form above. In Purchase Order, we can also allocate header charges to lines. We determine how this allocations should be carried out by navigating to Purchase tab → Charges → Allocate charges.
Untitled
The fields of Allocate Charges form are described below:
FieldDescription
Charges allocationIf the header charge is fixed in nature then it can be divided using the following options:
  1. Net Amount: Allocated according to line’s net amount
  2. Quantity: Allocated according to line’s quantity of units
  3. Per line: Allocated equally among all the selected lines
Allocate charges to linesChoose lines for allocation:
  1. All lines: All lines selected
  2. Positive lines: Positive quantity lines selected
  3. Negative lines: Negative quantity lines selected
Allocate allSelect if you want to include all kinds of charges in the allocation process regardless of the Debit type specified in the Charges code setup. By default, charges with Debit type of Item are included in the allocation process
ReceivedSelect to only allocate charges to received order lines
StockedSelect to only allocate charges to inventoried order lines
Show selection and clear specific linesSelect to exclude specific lines from this allocation. This check box is not available if no charges are set up
AX 2012: Charges Codes
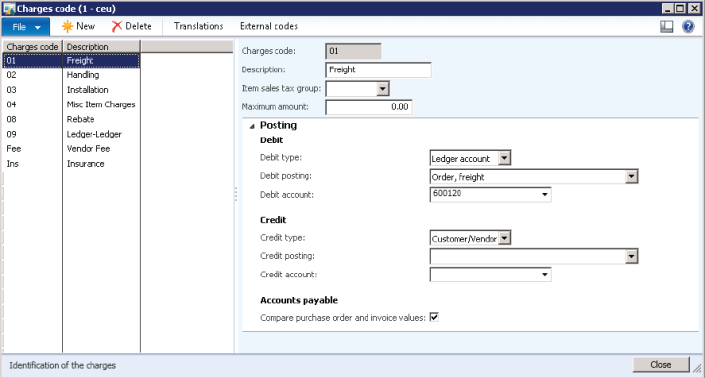
Before you plan to add manual or automatic charges when you create a sales or purchase order, you must setup Charges Codes. They are used to define the kind of charge and how the charge is going to be debited or credited. You can setup charges by navigating to Setup → Charges → Charges codes in the following 3 modules:
1. Accounts Receivable
2. Accounts Payable
3. Procurement and Sourcing
Untitled

Fields on the Charges codes form are described below:
1. Charges code: Unique code for the charge
2. Description: Brief description about the charge
3. Item sales tax group: An item sales tax group that can be used for calculating taxes on the charge
4. Maximum amount: Maximum amount allowed for the charge

Posting Fast Tab

Untitled
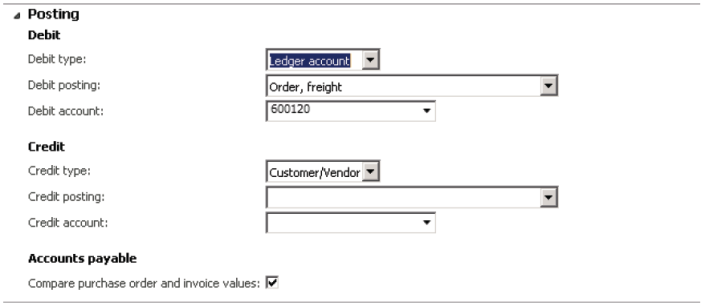
This is where the actual game happens. In this posting fastTab we define how to automatically debit and credit the charge. Both debit and credit sections have the following fields:
1. Type – Defines the entity which will be billed for the charge. Following are the available options:
  • Item – Charge is added to the item cost
  • Ledger Account – Charge is billed internally to the ledger account
  • Customer/Vendor – Charge is billed to the customer/vendor
2. Posting – Free text field to give the description which will be used while posting the charge to journals
3. Account – Defines the ledger account which must be debited/credited when Type is set to Ledger Account

So far we have understood what is the purpose of different parameters used to configure charges codes. Let us now create charges codes for sales and purchases. In both cases the parameters discussed will be set differently to cater to different needs of sales and purchases.

Charges Codes for Sales

For sales, you can configure charges in 2 different ways:
1. Customer
Charge is billed to the customer and is added to the sales order totals. Follow the steps below to achieve this functionality:
1. Open Accounts receivable > Setup > Charges > Charges code.
2. Click New to add a new code.
3. In the Charges code field, type a unique identifier for this charge.
4. In the Description field, type a short description of the charge.
5. Click the Item sales tax group arrow and select the sales tax group.
6. Click the Posting tab.
7. Setup the debit/credit fields as follows:
DebitTypeCustomer/Vender
PostingN/A
AccountN/A
CreditTypeLedger Account
PostingSpecify
AccountSpecify

2. Ledger Account (Internal)
Charge is billed to an internal ledger account and does not show up on sales transactions. Follow the steps below to achieve this functionality:
1. Open Accounts receivable > Setup > Charges > Charges code.
2. Click New to add a new code.
3. In the Charges code field, type a unique identifier for this charge.
4. In the Description field, type a short description of the charge.
5. Click the Item sales tax group arrow and select the sales tax group.
6. Click the Posting tab.
7. Setup the debit/credit fields as follows:
DebitTypeLedger Account
PostingSpecify
AccountSpecify
CreditTypeLedger Account
PostingSpecify
AccountSpecify

 Charges Codes for Purchases

For purchases you can configure charges in 4 different ways. Repeat the following basic steps for all of the 4 different configurations then we’ll see how to setup the Posting fastTab:
1. Open Accounts payable > Setup > Charges > Charges code.
2. Click New to add a new code.
3. In the Charges code field, type a unique identifier for this charge.
4. In the Description field, type a short description of the charge.
5. Click the Item sales tax group arrow and select the sales tax group.
6. Click the Posting tab.
Here are the 4 different configurations for the posting fastTab
1. Paying to Creditor – Billing to Item
Setup the debit/credit fields as follows:
DebitTypeItem
PostingN/A
AccountN/A
CreditTypeCustomer/Vendor
PostingN/A
AccountN/A

2. Paying Internally – Billing to Item
Setup the debit/credit fields as follows:
DebitTypeItem
PostingN/A
AccountN/A
CreditTypeLedger Account
PostingSpecify
AccountSpecify

3. Paying to Creditor – Billing Internally
DebitTypeLedger Account
PostingSpecify
AccountSpecify
CreditTypeCustomer/Vendor
PostingN/A
AccountN/A

4. Paying Internally – Billing Internally
DebitTypeLedger Account
PostingSpecify
AccountSpecify
CreditTypeLedger Account
PostingSpecify
AccountSpecify

Monday 16 March 2015

Commissions, setup and calculations in AX 2012

Commissions, setup and calculations in AX2012

Commissions in AX 2012 have been the Part of distribution and trade, commission is calculated for the sales person at every Sales order level based on the percentage of revenue or contribution Margin.
You need to do the following setups for commissions to calculate.
 When the sales order is being invoiced, AX 2012 searches for the related sales representative, item, and customer combination set up in the Commission calculation form. You can setup the Commission Customer group and the commission Item group, the reasons for the setup is because in a business you can sometimes base commissions on Customer sales and sometimes on Items sold. So you have the Customer Group commissions and Item Group commission setup form under the sales and marketing setup Commissions node.
Commissions in AX2012
The commission calculation form set up relationships between the combinations of items, customers, and sales representatives to define the commission rate an employee is paid from a sale, and for groups of sales representatives, items and customers. In this form you can also setup if the commission is before or after the line discount or total discount. The basis of calculation if it should be on the total revenue or just the margin. You can also give validity period from when to when the commission calculation is active.Microsoft Dynamics AX 2012
Commission posting is a form where you can setup the posting accounts. When a sales order is
Invoice-updated, the commission amount on the voucher is debited to the main account specified on the Commission account, and then it is credited to the main account specified on the Commission offset.ERP Solutions
Sales group is the most important of all the setups, The Commission sales group (CSG) specifies those employees that are eligible to receive a commission when a customer associated with the relevant sales group buys certain items. 
 You assign the Customer group and the sales group to the customer master, AX 2012 calculates sales commissions at the sales line level when a sales order is invoiced.
When the sales order is being invoiced, Microsoft Dynamics AX 2012 searches for the related sales representative, item, and customer combination set up in the Commission calculation form. The header View of the sales order will default the Sales group and the customer commission group. We can also assign the sales group at each sales order line also, if you want the sales group different in each line.
Commission sales group
Once the sales order in Invoiced in the Invoice Journal action pane you can click on the commission and view the commission split between the Sales representatives, also you can view the commission voucher generated for that sales orders by viewing the vouchers.

Saturday 14 March 2015

Over/Under Delivery

                                                  Over/Under Delivery
X Entertainment Systems has run low on its stock of 6001, Box –
corrugated, 16X18X40. The purchasing agent puts in an order with the vendor
for 1000 pieces. Typically, there is a 1 to 2 percent variance on the number of
lamp projectors received when ordering from this vendor. However, they offer
the best price. Because of the variance, Contoso Entertainment Systems and the
vendor have agreed to set up an over/under delivery variance to allow for a
difference of 10 percent because it is not cost-effective for either company to
create new orders or credit memos.

When the order arrives, there are 1018 pieces in the order. The order is accepted
because it is in the range that is specified in the over/under delivery setup.
Six months later, the stock is down to 500 so another order is made for 500 from
the same vendor. This time, the order contains 492 pieces. Again, the order is
accepted because it is in the range of over/under delivery setup.

Over/Under Delivery Setup

Set up an item to accept over/under delivery by using a two-step process:

1. Set up Accounts receivable and Procurement and sourcing
parameters to accept over/under delivery.
2. Define the acceptable tolerance percentage for over/under delivery

on the item.

Parameters
To perform the first step in the over/under delivery setup, you must set up the
appropriate parameter for both the Accounts receivable and Accounts payable
modules. These settings are global and affect all sales orders and purchase orders.
• To set up the parameters for sales orders, open Accounts receivable
> Setup > Accounts receivable parameters.
• To set up the parameters for purchase orders, open Procurement

and sourcing> Setup > Procurement and sourcing parameters.

Accept Over/Under Delivery

For both setup areas, on the Updates tab, under the General field group, set the
global parameter to allow for over delivery, under delivery, or both.
• If you select Accept overdelivery, you can receive or sell more
products through the packing slip / product receipt or invoice update
than the quantity ordered in the purchase or sales line.
• If you select Accept underdelivery, you can close out the backorder
if you receive or sell fewer products through the packing slip /
product receipt or invoice update than the quantity ordered in the

purchase line or sales line.


                      Under Delivery with a Purchase  Order

X Entertainment Systems needs 7000 pieces of item number 5012, 4-40
zinc nuts, in the production. To make sure that the items can go into production
immediately, the purchasing agent orders a quantity of 9000 in case any of the
items are defective.
1. Open Procurement and sourcing > Common > Purchase orders >
All purchase orders and then create a new purchase order for 9000
4-40 zinc nuts from vendor 4101, Fabrikam Supplier. Confirm the
order.
The vendor can deliver 8000 pieces. However, because this meets
the current needs, you tell the vendor not to deliver the backorder for
the 1000 pieces. Now you want to receive the 8000 pieces and close
the order so no backorders remain.
2. When the order line is highlighted in the purchase order, enter the
8000 pieces in the Receive now field.

3. Click Product receipt in the Receive tab of the Action Pane.
4. In the Posting product receipt form, make sure that Receive now
quantity is selected in the Quantity field under the Parameters field
group.

5. Type a product receipt number in the Product receipt field.

6. On the Lines tab, select the Close for receipt check box to close the

order and then click OK.Notice that the error provides you the calculated percent of the quantity that you
are trying to post. To manually override the default item tolerance settings and
close this order, you must return to the purchase order.

8. Highlight the purchase order line and then click the Delivery tab in
the Line details FastTab. Specify the value from the error 12.00 in
the Underdelivery field. Remember that the number in this field
represents a percent, not pieces. The Receive now quantity must still
be 8000 pieces.

9. Click Confirm on the Purchase tab of the Action Pane.

10. Click Product receipt in the Receive tab of the Action Pane.

11. Type a product receipt number in the Product receipt field.

12. On the Lines tab, select the Close for receipt check box to close the
order and then click OK.
This time, the order is posted and the order status changes to Received and there
is no backorder.

To view the transactions on the purchase order, follow these steps:

1. Click Product receipt in the Journal group on the Receive tab of
the Action Pane.
2. Click the Lines tab and notice that 9,000 are ordered and 8,000 have

are received. Also, there is no


                                       Over Delivery with a Sales Order

Customer 2021, Graphic Design Training Center, orders 90 pieces of item
number 1301, with configuration 01. A long-standing relationship with this
customer is established and this is a typical order for them.
During a production of 90 pieces, you sometimes have scrap and nonconforming
parts. To accommodate this, you always do a production run of 100 pieces. The
customer recognizes this and accepts that you can ship a bit less or more and has
decided on a 5 percent tolerance, over or under, on an order of 90 pieces.

1. Open Product information management > Common > Released
products and locate item number 1301.

2. Click Edit in the Maintain group on the Action Pane.

3. On the Sell FastTab, set up an over delivery tolerance of five percent
and an under delivery tolerance of five percent for sales orders so
that, order lines can be closed when the quantity falls within five
percent of what is ordered.

4. Close the Released product details form.

5. Open Sales and marketing > Common > Sales orders > All sales
orders.

6. Click Sales order in the New group to create a new sales order for
customer 2021, Graphic Design Training Center.

7. Add an order line for 90 pieces of the item number 1301,
configuration 01 (black) for customer 2021. Click No to override the

suggested order quantity.

8. Click Sales order confirmation in the Generate group on the Sell
FastTab of the Action Pane.

9. Click OK to confirm the sales order.


After a production run, you can ship all 100 pieces of item number 1301 –black,
to the customer Graphic Design Center. Ship these pieces and close the order.

1. Highlight the sales order line and then type "100" in the Deliver now
field.

2. Click Packing slip in the Generate group of the Pick and Pack tab
of the Action Pane to packing slip update the order.

3. In the Packing slip posting form, make sure Deliver now is selected
in the Quantity field under the Parameters field group.

4. On the Lines tab, select the Close check box to close the order and
then click OK.

The posting is rejected and gives the error Overdelivery of line is 11.11 percent,
but the allowed overdelivery is only 5.00 percent. Update has been canceled.
Notice that the error gives the calculated percent of the quantity you are trying to
post.
Knowing that the customer will not accept this order, you will reduce the number
of product to send to the customer. Now try to packing slip update the order to
ship the customer 92 pieces.

1. Highlight the sales order line and type "92" in the Deliver now field.

2. Click Packing slip in the Generate group of the Pick and Pack tab
of the Action Pane to packing slip update the order.

3. Select Deliver now in the Quantity field.


4. On the Lines tab, select The order is posted, the 92 pieces are shipped to the customer, and the order
status changes to Delivered.


To view the transactions on the sales order, follow these steps:

1. Click Packing slip in the Journal group on the Pick and pack tab.
2. Click the Lines tab and notice that 90 are ordered and 92 are
delivered.


disposition codes and return reason codes [AX 2012]


To support their process for returning products, a company can create and use return reason codes and disposition codes in Microsoft Dynamics AX.
Use a return reason code to describe the reason that the customer wants to return an item. You can assign a reason code in the Create return order form.
Assign a disposition code when an item is received or during the physical inspection of a returned item. You can use disposition codes to describe the condition of the item. You can also use disposition codes to indicate whether additional action is required for the transaction. For example, create disposition codes for the following actions:
  • Scrap the returned item and provide a replacement item to the customer.
  • Return the item to inventory and credit the customer for the cost of the item.
  • Repair the item and return it to the customer.

Monday 9 March 2015

Creation of Inventory Journal Names and Assigning to Journals in Microsoft Dynamics AX 2012

Creation of Inventory Journal Names and Assigning to Journals in Microsoft Dynamics AX 2012

In Inventory Management to adjust Inventory we need to perform those adjustment operation through Inventory Journals. Inventory Journals are Movement, Adjustment (previously known as Profit & Loss in earlier versions) , Transfers and BOM (Bill of Materials)
To create and post any Journal there are few prerequisites, like Journals names and Number sequence code or voucher series.
Now let us discuss regarding Journal name creation and assigning to related Inventory journals in MS Dynamics 2012.
To post any Journal we need to create a related journal name and need to assign to related Journal type. Another one is we need to assign related Number sequence code or voucher series to Journal.
For creating journals Navigate through below path
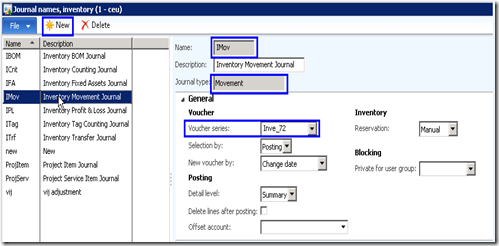
Inventory and warehouse management—>Setup—>Journals—>Journal names.
image
In the journal names form we can create the name and description of the journal also we can assign the Number sequence voucher series.
Click New tab in the top of the form and enter a specific name in the Name field and in description field.
Select Journal type as required in the Journal type field. 
Select Voucher series code in the General pane section in Voucher series field (Number sequence code)
Select Selection by option as required, options are Posting and Entry.
select New voucher by option as required, options are Change date and change date or item
Select option in Detail level field. options are Summary and Detail.
Select the check box Delete lines after posting if required. if selected journal lines are deleted after posting.
select ledger account in the Offset account field as required. (Note: This is applicable or enabled only for Movement journal type only)
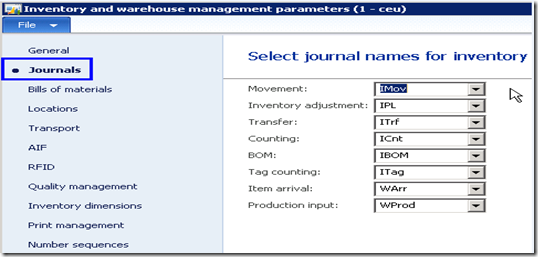
The Journal names which were created should be assigned to the related Journals in below mentioned path.
Navigate to Inventory and warehouse management—>setup—>Inventory and warehouse management parameters—> Journals Fast tab –>All the Inventory Journals are displayed—> select the related journal names from the drop down menu.
image
Now Journals are ready for usage.