Creation and Posting of Movement Journal in Microsoft Dynamics AX 2012
process of Movement journals posting in Inventory management.
The Movement journal can be used to bring in opening Inventory balances during system setup and offset these adjustments to specific ledger accounts.
- To create and post Movement journal follow below navigation.
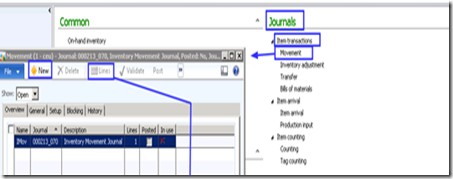
- Navigate to Inventory and warehouse management—>Journals—>Item transactions—>Movement
- Click “New” icon on the Movement journal form as shown in above screenshot
- Select a Journal name as required say “Imov” as shown in above screenshot
- Click Lines icon in the same form as shown in the above screenshot
- A new journal lines form is opened,
- Select item number in the ‘Item number’ field
- Enter if required item dimensions like Configuration, Size and Color.
- Enter if required Storage dimensions like Site, Warehouse, Location and Pallet ID. (Warehouse is mandatory, Site is mandatory if Site is activated).
- Enter if required Tracking dimensions like Serial and Batch number.
- Enter some value in ‘Quantity’ field.
- If you are going to add or intake the inventory you need to put positive value in the ‘Quantity’ field. If the value is positive you can edit the value displayed in Cost amount field.
- If you want to remove or decrease inventory you need to put negative value in the ‘Quantity’ field. Here you can’t edit the values displayed in ‘Cost amount’ field(As shown in above the screenshot).
- Select a Ledger account as per the requirement in the ‘Offset account’ field. (This is applicable and visible only for Movement journal and this is specialty of this journal).
- Now if required, add some more items by creating another line and enter all related values in related fields.
- Now journal is ready to post.
- Click ‘Validate’ icon in the top of the form and click ‘OK’ option to validate whether the data entered is correct or not before actually posting the journal.
- If you get any Warning or Information or Error logs please address them and proceed for Posting
- To post the journal, click ‘Post’ icon on the top of the form and click ‘OK’ in the Posting form.
- Now you will see an information log as Journal is posted successfully


No comments:
Post a Comment